Thursday 28 April 2011

Making buttons with Inkscape


During my university studies I've made several buttons for TKO-äly, the organization for computer science students at Helsinki University. Here I'll describe my method for creating these buttons. The usual process is that I first sketch the button on paper, then draw the main image on paper or with Inkscape. Finally I composite the image with background and place several complete images on a single A4 sheet for printing, both using Inkscape. The printed images are then cut out from the paper sheet and made into buttons using a hand-operated button tool.

This post will be rather image-heavy, so it'll continue after the jump.

Tuesday 19 April 2011

Filter effects: Gaussian blur

This is part of my Filter effects tutorial series.

Gaussian blur makes objects appear softer and less clearly defined. Even by itself it is so useful that it was the first filter effect to be implemented in Inkscape. It also has received an own place in the Fill and Stroke editor:

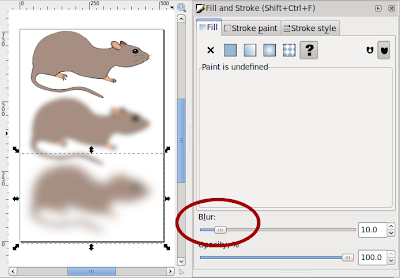
When you use that slider, it creates a filter effect that contains a single Gaussian blur primitive and attaches that to selected object.

There are different kinds of blur. In Gaussian blur the colour from any pixel spreads out according to the Gaussian function (aka. bell curve). That means that the colour of any pixel stays mostly near itself, but some colour spreads out to a large area – in fact the colour spreads out to an infinitely large area, but in practise the contribution can't be seen quite far away. Another example of blur would be bokeh, the depth of field effect seen when some objects in a photo are out-of-focus. It is quite different from Gaussian blur: bokeh depends on the camera lens used, but usually spreads colour evenly to a circular area.

Gaussian blur is also useful as part of more complex filters. Many of the pre-defined filters in Inkscape distribution include blur. Here I'll show a couple examples. First up is drop shadow:

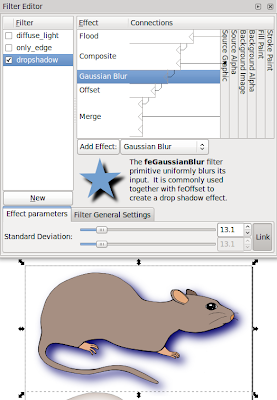
Here the Flood primitive is used to set the shadow colour, Gaussian blur to make the shadow softer and Offset to move the shadow.

Next up is filter that shows only object edges:

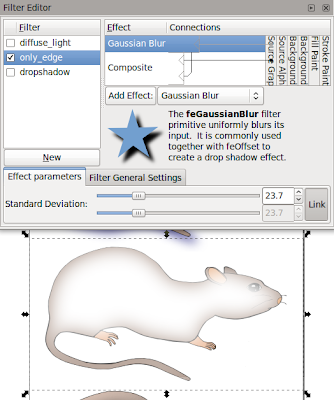
The Composite is in mode "out", meaning that we take parts of original image that are not in blurred image.

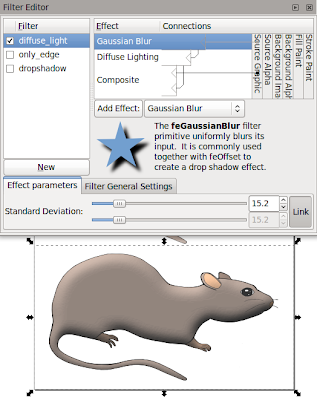
Last up is lighting filter, which requires a height map. Gaussian blur can be used to create an easy height map.


The SVG sources for the images are available from my filter tutorials repository at GitHub.

Sunday 17 April 2011

Filter effects: Flood

This is part of my Filter effects tutorial series.

Flood may be the most simple filter primitive there is. It simply fills the whole filter area with one colour. By itself it's mostly useless, but it's often handy as part of more complex filters.

Here's a simple – almost stupid – example to show what Flood does by itself:

When you have a filter like this, the result will look like this:


Of course, this is probably the most inefficient way of using Inkscape to create a solid-coloured rectangle. So let's take a more interesting example. If you have ever tried to add a thick stroke to a text, you will have noticed that the result doesn't look too good. One way around this problem is to create a filter as follows:

Here I use the Morphology filter primitive in Dilate mode to create a thicker version of the text and Flood filter primitive to create the stroke colour. With Composite I do the operation "stroke colour in thick text", essentially colouring the thick text with my intended stroke colour. Finally, I take this thick, coloured text and composite the original text on top of it with Merge.

As you can see here, the version using stroke paint has certain problems, especially with the small holes in 'a', 'e' and 'f'. The filter produces a much nicer look, preserving the outline shape of the letters.

In a similar fashion you can use Flood in other filters to add in colours that don't exist in the original image.

The SVG sources for the images are available from my filter tutorials repository at GitHub.

Thursday 14 April 2011

Filter effects: Displacement map

This is part of my Filter effects tutorial series.

Displacement map is used to warp images in different fashions. For example many of you may have seen a screen saver that warps a small, moving area of the desktop. That warping effect is done with a displacement map.

The displacement map filter primitive takes two input images: the image to be warped and a displacement map. The colour in displacement map defines, where the colour for this pixel should come from: you can pick one of the red, green, blue and alpha colour channels for vertical displacement and one for horizontal displacement. Light colours in selected channel make the filter take colours from below or right (or moves the image up or left). Likewise dark colours get the filter to pick colours from above and left. Mid-grey means zero displacement.


Here are some examples what filters can do. The top two cases show how solid colour displacement map simply moves the image (Offset filter is better for that, though). Interesting results come from using gradients (3rd example) or noise (4th example, using Turbulence filter)


These examples used filter set up as follows:

The Image filter primitive is used to grab the bunny as source image and then displacement map filters that using its own colours as the displacement map. This is for top two examples, the bottom two are similar but use scale of 28.8.

The meaning of displacement map setting is as follows:

  • First input image specifies the image to warp

  • Second input image specifies the displacement map

  • Scale specifies how large displacement should be

  • X and Y displacement specify the colour channels to use for horizontal and vertical displacement, respectively


There are some gotchas in building displacement map filters. It is best to use only completely opaque colours or only different levels of opacity to specify the displacements: on low opacities the colour information may be partially or even completely lost and this'll cause problems. The second thing is that the filter effects editor in Inkscape has occasional problems: on new displacement map primitive it may be needed to explicitly change X and Y displacement to non-default values (and back again, if you want the default)

The SVG sources for the images are available from my filter tutorials repository at GitHub.