Writings and tutorials on Filter Effects in Inkscape — and sometimes other stuff in field of graphics and open source.
Thursday, 28 April 2011
Making buttons with Inkscape
During my university studies I've made several buttons for TKO-äly, the organization for computer science students at Helsinki University. Here I'll describe my method for creating these buttons. The usual process is that I first sketch the button on paper, then draw the main image on paper or with Inkscape. Finally I composite the image with background and place several complete images on a single A4 sheet for printing, both using Inkscape. The printed images are then cut out from the paper sheet and made into buttons using a hand-operated button tool.
This post will be rather image-heavy, so it'll continue after the jump.
So, first up is sketching. Nothing special here, really, just planning what the main subject of the button should look like. My sketchbook is in a rather bad shape so I don't know if I should show you this... Oh well, here it goes:
Next up is drawing. When working with a computer I like to use Inkscape and my drawing tablet (Wacom Bamboo Fun). When working on paper my tool of choice is Letraset ProMarkers, I just love those colours. The penguin above was drawn with Inkscape, so I'll show that first.
The first penguin there is the basic shape I drew, mostly using the Pen (Bezier curve) tool and then tweaking the path using Node tool until they seem fine. The rest are modifications of that image. That year TKO-äly became 20 years old, thus all the sparkly wine and the fancy clothes in last two.
When drawing on paper, the process involves a couple other programs apart from Inkscape. To scan the image I usually use XSane. The scanned images tend to have somewhat off-white backgrounds, but I'd like them to have transparent backgrounds to make it easier to composite the final image in Inkscape. For this I use The GIMP. I add a transparency channel to the scanned image and use rubber eraser tool to make the image background transparent. When the result is saved as PNG, the transparency will work as-is in Inkscape. Here are a couple examples of images drawn with ProMarkers and cleaned up as described above:
So, this far this has been mostly basic stuff. There are a ton of tutorials out there on how to draw things with Inkscape. Now I'll go into specifics that apply to buttons.
I have a simple base image for creating buttons. It looks like this:
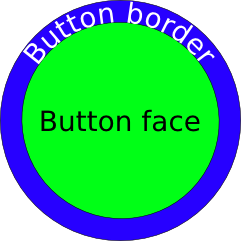
Basically, that's eight button-sized circles on a single A4 page, each the correct size for the badge making tool we're using. One can print this page out as-is and draw inside the circles with markers or crayons or... But, as I'm now describing the process with Inkscape, we'll composite the previous images and some background inside these circles. But first an important thing to notice: on that page there are two circles per badge, one larger and one smaller. For good-looking badges it's important to know what these two circles are for.
The inner circle defines the button face. In this area you should put all the important content of you button. Also, it's probably best to not use quite the whole area, as making the buttons is not too precise a process and buttons tend to curve outwards slightly already inside this area. While the content should fit inside the inner circle, the image should extend all the way to outer circle. While not exactly legible, the border area is still visible on the button, as can be seen here:
So, with this in mind, I composite the drawn image, text and some background inside these circles:
The inner circle has already been removed from this image as it is there just to help in designing the badge, it's not supposed to appear on the final badge. You can still notice how all the text and the Cheshire cat image stay well clear of the outer circle.
Then I composite eight of these images on one A4 sheet:
After printing that sheet, all that's left is to make the actual buttons. For this, I cut out the images from that sheet by the outer circle and then use a hand-operated button tool to attach together a backing with a safety pin, a metal base, the image and a plastic protective film.
That's it. This way I've created several different buttons for my student organization and they definitely have found their use. You can do this yourself, too: the only hard part is obtaining a badge tool – they aren't exactly cheap and unless you're making a lot of buttons, there's not much point in buying one. The one I've used is owned by a university-wide student organization and thus shared between dozens of organizations such as TKO-äly.
Subscribe to:
Post Comments (Atom)


2 comments:
Thanks for describing this. =)
good job, I have to explore this possibility
Post a Comment